May the force be with you….

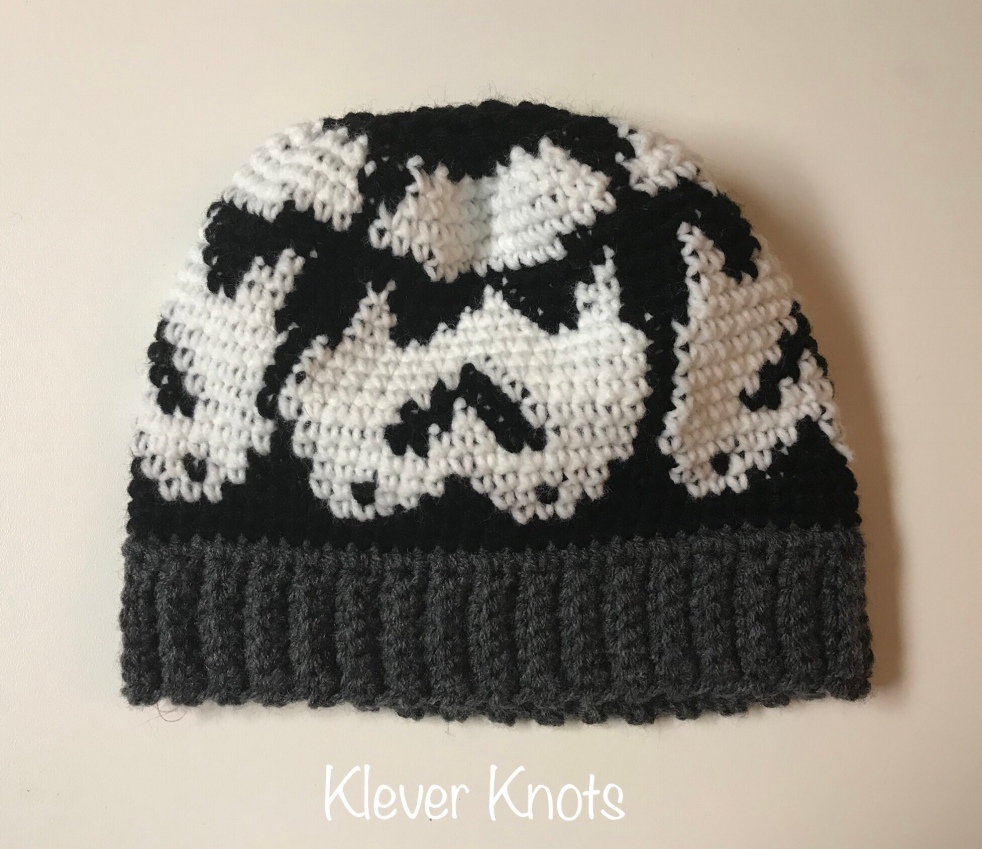
Stormtroopers.. what?!!! Yes. I did that!

Every year for Christmas I make my nephews new winter toques. I’ve done it ever since they were born, so it’s kind of become a tradition. They’ve gotten some pretty awesome hats over the years… everything from, Cars to Mario & Luigi to matching Sully & Mike hats… not to toot my own horn or anything… but this year they were really into Star Wars, which I know very little about, so I really had to bring it up a notch and make something that would really blow them away! I found an awesome paid pattern on Ravelry for a BB8 hat, and I knew instantly that my youngest nephew would love it. Done deal! My oldest nephew, however, needed something a little more grown up and I was really struggling to find an awesome Star Wars hat pattern in a suitable size for him. When googling “Star Wars” I happened across a graph of a stormtrooper head and that’s when I decided that I would just create my own hat based on that graph alone. End result – nephews LOVE their news hats and Auntie Manna is the bomb this year! 😉 Ultimately, though, the pattern is way too cool not to share.. so without further ado, here it is!!

Stormtrooper Hat

This hat pattern is made to fit a large child or preteen. To increase or decrease in size you may begin with more or less ribbing rows (since the hat is worked from the bottom up). Just remember that with this pattern you MUST work in multiples of 17.

I used a 5mm / H hook and Red Heart Super Saver in charcoal, white, and black for this project. Any basic medium worsted weight will do.

What you’ll need:

  • Scissors
  • Tapestry needle
  • 5mm / H crochet hook
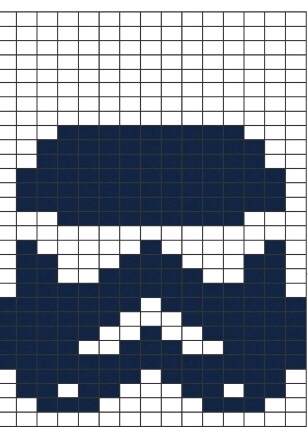
  • Stormtrooper graph to follow

Stitch Abbreviations

Ch – Chain

Ss – Slip stitch

St(s) – Stitch(es)

Sc – Single crochet

Hdc – Half Double crochet

Hdc2tog – Half Double crochet 2 Stitches together

BLO – Back loops only

Colours will be referred to as:

CA – Colour A (charcoal)

CB – Colour B (black)

CC – Colour C (white)

Note: it helps to carry your yarn behind your stitches as you go, making colour changes easier. BE CAREFUL OF YOUR TENSION!

Hat Ribbing

With CA ch 9. (68)

  1. Sc in 2nd ch from hook, sc across to end. Ch 1. Turn. (8)
  2. Sc in first st, sc BLO in next 6 sts, sc through both loops of last sc. Ch 1. Turn. (8)
  3. Repeat row 2 until you have a total of 68 rows. Ch 1.
  4. Bring ends together, ss in each st across BOTH ENDS in the same fashion you worked row 2.
  5. Turn ribbing so your seam is on the inside.

Change to CB.

Hat Body

For visual colour changes please refer to stormtrooper graph posted above. White boxes are CB and black boxes are CC. ** If using written pattern only please pay very close attention to colour changes!!

  1. Using CB sc 68 sts evenly across ribbing. Ss to first sc. Ch 1.
  2. With CB sc in same st as joined and in each of next 2 sts, *with CC sc in next 3 sts, with CB sc in next 5 sts, with CC sc in next 3 sts, with CB sc in next 6 sts*. Repeat from * to * around to last 3 sc, using CB sc in last 3 sts. Ss to top of first sc. Ch 1.
  3. With CB sc in same st as join and in next st, *with CC sc in each of next 2 sts, sc once with CB, sc with CC in next 2 sts, with CB sc in next 3 sts, sc with CC in next 2 sts, sc once with CB in next st, sc with CC in next 2 sts, with CB sc in next 4 sts*. Repeat * to * around to last 2 sts, using CB sc in last 2. Ss to top of first sc. Ch 1.
  4. With CB sc in same st as joined and next st, *with CC sc in next 6 sts, with CB sc in next st, with CC sc in next 6 sts, with CB sc in next 4 sts*. Repeat from * to * around to last 2 sts, using CB sc in last 2 sts. Ss to top of first sc. Ch 1.
  5. With CB sc in same st as joined, *with CC sc in next 15 sts, with CB sc in next 2 sts*. Repeat from * to * around to last st, using CB sc in last st. Ss to top of first sc. Ch 1.
  6. With CB sc in same st as joined, *with CC sc in next 4 sts, with CB sc in next 2 sts, with CC sc in next 3 sts, with CB sc in next 2 sts, with CC sc in next 4 sts, with CB sc in next 2 sts*. Repeat from * to * until last st, using CB sc in last st. Ss to top of first sc. Ch 1.
  7. With CB sc in same st as joined, *with CC sc in next 5 sts, with CB sc in next 2 sts, with CC sc in next st, with CB sc in next 2 sts, with CC sc in next 5 sts, with CB sc in next 2 sts*. Repeat from * to * around to last st, using CB sc in last st. Ss to top of first sc. Ch 1.
  8. With CB sc in same st as joined, *with CC sc in next 6 sts, with CB sc in next 3 sts, with CC sc in next 6 sts, with CB sc in next 2 sts*. Repeat from * to * around to last st, using CB sc in last st. Ss to top of first sc. Ch 1.
  9. With CB sc in first st as joined, *with CC sc in next 7 sts, with CB sc in next st, with CC sc in next 7 sts, with CB sc in next 2 sts*. Repeat * around to last st, sc using CB in last st. Ss to top of first sc. Ch 1.
  10. With CB sc in same st as joined, sc in next st, *with CC sc in next 13 sts, with CB sc in next 4 sts*. Repeat * around to last 2 sts, using CB sc in each of last 2. Ss to top of first sc. Ch 1.
  11. With CB sc in first 2 sts, *with CC sc in next 2 sts, with CB sc in next 2 sts, with CC sc in next 5 sts, with CB sc in next 2 sts, with CC sc in next 2 sts, with CB sc in next 4 sts*. Repeat from * to * around to last 2 sts, using CB sc in last 2 sts. Ss to top of first sc. Ch 1.
  12. With CB sc in first 2 sts, *with CC sc in next 2 sts, with CB sc 3 sts, with CC sc in next 3 sts, with CB sc in next 3 sts, with CC sc in next 2 sts, with CB sc in next 4 sts*. Repeat from * to * around to last 2 sts, using CB sc in last 2 sts. Ss to top of first sc. Ch 1.
  13. With CB sc in first 2 sts, *with CC sc in next st, with CB sc in next 5 sts, with CC sc in next st, with CB sc in next 5 sts, with CC sc in next st, with CB sc in next 4 sts*. Repeat ** around to last 2 sts, using CB sc in last 2. Ss to top of first sc. Ch 1.
  14. With CB sc in each st around to last sc. ss to first sc. Ch 1.
  15. With CB sc in first 5 sts, *with CC sc in next 9 sts, with CB sc in next 10 sts*. Repeat from * to * to last 5 sts, sc using CB in last 5 sts. Ss to top of first sc. Ch 1.
  16. With CB sc in first 2 sts, *with CC sc in next 13 sts, with CB sc in next 4 sts*. Repeat * around to last 2 sc, using CB sc in last 2 sts. Ss to beginning sc. Ch 1.
  17. Repeat row 16.
  18. Repeat row 16.
  19. With CB sc in first 3 sts, *with CC sc in next 11 sts, with CB sc in next 6 sts*. Repeat * around to last 3 sc, using CB sc in last 3 sts. Ss to first sc. Ch 1.
  20. Repeat row 19.
  21. With CB sc in first 4 sts, *with CC sc in next 9 sts, with CB sc in next 8 sts*. Repeat from * to * around to last 4 sts. Using CB sc in last 4 sts. Ss to top of first sc. Ch 1. *Drop carried CC.
  22. Using only CB from this point forward hdc in each st around. Ss to first hdc. Ch 1.
  23. Hdc in first st, *Hdc2tog in next 2 sts, hdc in next st*. Repeat from * to * around to last st. Ss to first hdc. Ch 1.
  24. Repeat row 22.
  25. Repeat row 23.
  26. Hdc2tog every st around. Ss to first Hdc2tog. Fasten off leaving long tail.
  27. Turn hat inside out and, using tapestry needle, weave your tail in and out of every st remaining. Pull tail to close opening at top of hat. Knot tail to ensure security and weave in ends.

..……

This is a FREE pattern and may be shared but not SOLD. Finished products using this pattern may be sold, but please be kind and link back to this blog. Thank you.

Happy Hooking!

The Quad-Cable Messy Bun Hat

I just want to start with saying that I love cables! It’s funny, I used to be intimidated by any pattern that called for them, but after working up a few cable hats in a ridiculously short amount of time, I quickly learned that cables only look hard! So, if you’re someone who’s been wanting to try cables – DO IT! I promise you won’t be disappointed. There’s a ton of great YouTube tutorials out there that can definitely help you past any intimidation you might feel about delving into cables. I recommend Mikeysmail from the crochet crowd. His YouTube videos have been a God send to me in the past.

The Quad-Cable MBH

This past New Year’s Eve I was sitting with friends when one of them asked if I could make her a messy bun hat .. but she didn’t want just any MBH, she wanted cables (or “braiding” as she called it) much wider than the traditional ones she’d been admiring on the hat I gave my sister in law for Christmas. That’s what inspired me to create this new pattern. Double up a cable?!! Challenge accepted!! Because who doesn’t love something new and just a little different from the norm?!

For this pattern I used a medium worsted weight bulk brand yarn from Micheals called FASHION PLUS in a beautiful powder / winter blue. I’d tell you the exact name of the colour but it isn’t written on the bag, so powder / winter blue it is! 😉

What you’ll need:

  • H / 5mm Crochet Hook
  • I / 5.5mm Crochet Hook
  • Tapestry Needle
  • Scissors
  • A Hair Elastic

Stitch Abbreviations:

Ch – Chain

St(s) – Stitch(es)

Ss – Slip stitch

Sk – Skip indicated stitch(es)

Sc- Single crochet

Dc – Double crochet

Fpdc – Front post double crochet

Bpdc – Back post double crochet

Fptc – Front post triple / treble crochet

Fpqc – Front post quadruple crochet

Dc2tog – Double crochet 2 together

BLO – Stitch in back loop only

Hat Ribbing

Using 5mm / H hook – Ch 7

  1. Sc in 2nd ch from hook, sc in next 5 ch. Ch 1. Turn. (6)
  2. Sc through both loops of 1st sc, sc BLO of next 4, sc through both loops of last sc. Ch 1. Turn. (6)
  3. Repeat last row 70 more times until you have a total of 72 rows. Ch 1.
  4. Brings ends together. Sc through both loops of first st on both ends, working through BOTH ENDS – sc in ch and front loop only of next 4 sts, sc through both loops of last sc. Turn ribbing inside out so seam is on the inside.

Hat Body

Change to 5.5mm / I Hook.

  1. Sc 72 sts evenly around ribbing. Ss to top of first sc. Ch 2.
  2. Dc in same st and joined, dc in each st around. Ch 2.
  3. Fpdc around first dc from previous row, bpdc around next. *Sk next 4 sts, fpqc around next 4 dc from previous row, fpqc around 1st skipped dc and around each of next 3 skipped sts. Bpdc next st after 8th fpqc, fpdc next 2 sts, bpdc around next*. Repeat * to * to end, bpdc in last st. Ss to top of first fpdc. Ch 2.
  4. Fpdc around 1st st, bpdc around next. *Fptc around next 8 fpqc (be careful to do sts in order, your first 4 will be sort of hiding behind your work!) Bpdc around next, fpdc around next 2 sts, bpdc around next*. Repeat * to * around. Finish with bpdc in last st. Ss to top of first fpdc. Ch 2.
  5. Fpdc around first st, bpdc around next, *fpdc around next 8 sts, bpdc around next st, fpdc around each of next 2 sts, bpdc around next st*. Repeat * to * until last st. Bpdc in last st. Ss to first fpdc. Ch 2.
  6. Repeat rows 3 through 5 three more times. Ch 2.
  7. Repeat row 3. Ch 2.
  8. Dc in every stitch around being careful to dc in tops of cables appropriately in order. Ss to top of first dc. Ch 2.
  9. Dc in first st, *dc2tog over next 2 sts, dc in next st.* Repeat * to * to end. Ss to top of first dc. Ch 2.
  10. Dc2tog in each st around. Ss to top of first dc2tog. Ch 1.
  11. Sc around hair elastic and each st around. Fasten off. Weave in ends.

OR

Alternate 11. For Beanie – Continue dc2tog in every st around this row, then fasten off leaving long tail for sewing hat closed. Weave in ends.

This is a FREE pattern and may be shared but not SOLD. Any finished product made from this pattern may be sold, but please be kind and link back to this blog. Thank you!

Happy Hooking & Happy New Years! 🙂

The Emily Cross Set

I absolutely love this scarfie and hat set! I’m pretty proud of the Scarfie alone, if I’m honest; Something between a scarf and a cowl, and quite elegant if I do say so myself. I’ve even considered trying to draw up a pattern from this with an added hood for the younger generation and all the hoodie lovers out there, like myself. I was inspired to design this because I wanted something new, trendy and stylish. Something I could stamp my label on and proudly call my own! I came up with this crossover and paired it with a matching hat over the course of a couple of days.. Though I’d like to call the hat a “hybrid” because it can be made in a couple different sizes and styles, and who doesn’t love variety?? You can find the matching “hybrid” hat pattern here as well.

I’ve been crocheting for several years now.. admittedly almost all self taught, thanks to many how to books and YouTube tutorials. Although, my mother taught me the basics when I was in my early teens. I didn’t get much past learning to do a foundation chain and your basic granny square back then, though, but after the discovery of our 5th pregnancy in 2011 I was inspired to learn to make all the crocheted things. And so my journey into the lovely world of Klever Knots began…. I have thoroughly enjoyed this journey. The things that I never thought I could do with a hook and some yarn, and the amazing self gratification that comes with the completion of every project never gets old. It almost feels like a superpower, right along with keeping six tiny humans alive! 😉 I remember beaming with pride at the end of my first crocheted blanket, a welcoming gift for our 5th born, and it still makes my heart full when I see my sweet girl dragging it around with her like it is the most cherished item she owns. ❤️

I’ve been trying my hand at creating new designs for some time but I never quite got the hang of writing patterns. To be honest, it’s a bit of a daunting task, and I don’t much enjoy it.. but I love the idea of sharing my love for crochet with my fellow hookers. So much so that I just can’t keep this one to myself.

Please forgive the mess of the following patterns, as like I said, I’m pretty new to this whole pattern writing stuff. If you need any help or have any suggestions to make the pattern better and easier to follow, please don’t hesitate to leave a comment and I will do what I can to help.

Happy Hooking & Happy Holidays!

With love from, Amanda.

Owner & Creator of Klever Knots ♥️

Emily Cross Scarfie I used a single skein of a bulk wool blend worsted weight (4) from my local Micheals store. Any medium worsted weight yarn will do for this project.

You will need: J / 6mm Hook

Scissors

6 buttons

Tapestry needle

Stitch Abbreviations – for both patterns: Ch – Chain

St – Stitch(s)

Ss – Slip stitch

Sk – Skip

Sc – Single crochet

Hdc – Half double crochet

Dc – Double crochet

Fpsc – Front post single crochet

Fpdc – Front post double crochet

Bpdc – Back post double crochet

Fptrblc – Front post triple crochet

Bptrblc – Back post triple crochet

BLO – Back loops only

FLO – Front loops only

Bwsc – backward single crochet

Special Stitches: 3rd loop only sc – if you are unfamiliar with this stitch I recommend googling it now! Trust me, there are several videos on YouTube that show you how this stitch is done.

Bwsc – This backwards single crochet is worked exactly as it sounds – backwards. Rather than working from right to left, you will work the stitches backward from the left to the right resulting in a beautiful rounded edging.

Ch 109.

1. Sc in 2nd ch from hook and in every st across. Ch 1. Turn. (108)

2. Hdc across. Ch 1. Turn. (108)

3. Sc in first st, then sc in third loop of hdc across to 2nd last st, sc in top of last hdc. Ch 2. Turn. (108)

4. Dc across. Ch 1. Turn. 108)

5. Hdc in first st, *fpdc in next, bpdc in next st*, repeat * across, hdc in last st. Ch 1. Turn. (108)

6. Hdc across. Ch 1. Turn. (108)

7. Sc in first st, sc in 3rd loop across, sc in last st. Ch 2. Turn. (108)

8. Dc across. Ch 1. Turn. (108)

9. Hdc in first st, bpdc in next, fpdc in next, *sk 2 sts bptblc in next 2 sts, bptrbc in first 2 first sk sts, fpdc in next, bpdc in next, bpdc in next*, repeat * 14 more times, fpdc in 3rd st from end, bpdc in 2nd last st, hdc in last. Ch 1. Turn. (108)

10. Hdc in first st, fpdc around last bpdc of precious row, *bpdc around next. Fpdc around next 4 bpdc of last row, bpdc, fpdc, bpdc*. Repeat * 14 times. Hdc in last st. Ch 1. Turn. (108)

11. Hdc in first st, bpdc around next, fpdc around next, *bpdc around next 4 fpdc from devious row, fpdc around next, bpdc around next, fpdc*. Repeat * 14 more times. Hdc in last. Turn ch 1. (108)

12. Repeat row 9. Ch 1. Turn. (108)

13. Hdc across. Ch 1. Turn. (108)

14. Sc in first st, sc in 3rd loop only across, sc in last st. Ch 2. Turn. (108)

15. DC across. Ch 1. Turn. (108)

16. Hdc in first st, *bpdc in next, fpdc in next*. Repeat * across. Hdc in last st. Ch 1. Turn. (108)

17. Hdc across. Ch 1. Turn. (108)

18. Sc in 1st st, sc in 3rd loop only across, sc in last st. Ch 1. Turn. (108)

19. Hdc across. Ch 1. Do not turn!

20. Backwards sc around. Ss to first bwsc, fasten off and weave in ends.

Add buttons and voila!

Emily Cross Hat H / 5mm & I / 5.5mm hooks

Medium worsted weight yarn.

Women’s For toddler, children’s and men’s sizing alter stitch counts (including ribbing rows) to toddler (50), child (60), and men’s (80). Then follow directions with adjusted stitch count. *Stitches are worked in multiples of 10.

Ribbing – Using H hook ch 9 (7/5/11).

1. Sc across. Ch 1. Turn. (8)

2. Sc in first st, sc BLO in next 6 sts, sc in last st. Ch 1. Turn. (8)

3. Repeat row 2 until you have 70(50/60/80) rows total.

4. Bring ends together and ss FLO across. This is your seam, turn inside out so the seam is on the inside of the ribbing. Change to I Hook.

Hat Body Starting Ch does not count as st!!

1. Ch 1. Sc 70 (50/60/80) sts evenly

around. Ss to top of beginning sc. ch 2. (70/50/60/80)

2. Dc in same st and around. Ss to 1st dc. Ch 2. (70/50/60/80)

3. *Fpdc in first st, bpdc* in next st, repeat * around. Ss to first st. Ch 1. (70/50/60/80)

4. Scfp every st around. Ss to previous fpdc from round 3. Ch 1. (70/50/60/80)

5. Sc in top of fpdc & bpdc from round 3. Ss to first st. Ch 1. (70/50/60/80)

6. Fpsc every st around. Ss to first st from previous round. Ch 1. (70/50/60/80)

7. Repeat row 5. Ch 2. (70/50/60/80)

8. Dc around. Ss to first dc. Ch 2. (70/50/60/80)

9. Fpdc in first st, bpdc in next. *Sk 2 sts, fptblc in next 2 sts, fptrbc in first 2 skipped sts, bpdc in next st, fpdc in next, bpdc in next st.* Repeat * around. Ss to top of first fpdc. Ch 2. (70/50/60/80)

10. Fpdc and bpdc around every fptblc, fpdc, and bpdc around. Ch 2. (70/50/60/80)

11. Repeat round 10. Ch 2. (70/50/60/80)

12. Repeat round 9. Ch 1. (70/50/60/80)

(for toddler) size skip to rnd 16) 13. Sc around. Ch 1. (70/50/60/80)

14. Repeat rounds 4-7 once. Ch 2. (70/50/60/80)

(for child size sk to rnd 16) 15. Repeat rounds 2-3 once. Ch 1. (70/50/60/80)

16. *Hdc in first st, hdc2tog next 2 sts*. Repeat* around. Ch 1. (35/25/30/40)

All sizes follow last 2 rounds. 17. Hdc2tog in first 2 sts and every st around. Ch 1.

for men’s beanie repeat Rnd 15 once more. 18. For women’s closed Beanie – Fasten off leaving a long tail to cinch top closed. Turn inside out to weave in ends. Add a Pom or leave plain. You may also consider chaining 30 and weaving it in to be used as a draw string so the hat can be worn as a beanie or messy bun hat.

19. For MBH – Sc in ea st and around a hair elastic. Ss to beginning sc. fasten off and weave in ends. OPTIONAL: If not using a hair elastic just sc around and fasten off. Weave in ends.

Feel free to share this pattern for FREE with your friends, finished products using this pattern may be sold.. but please share the love and remember to link back to this blog. ♥️