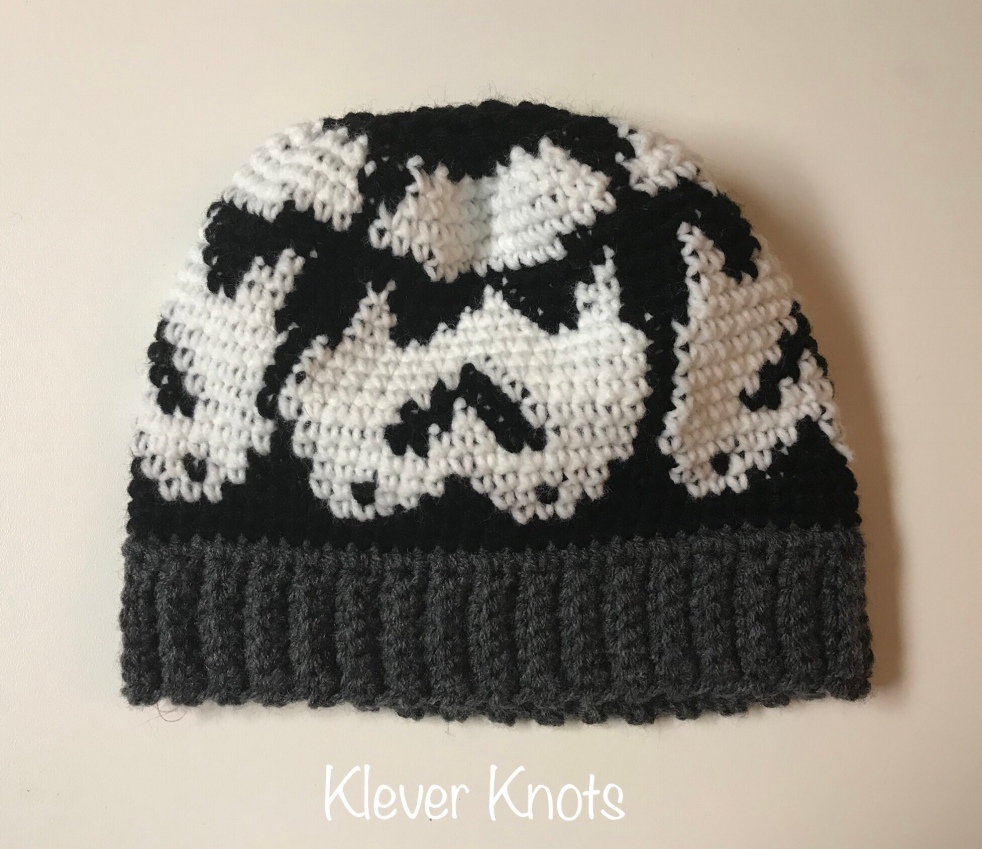
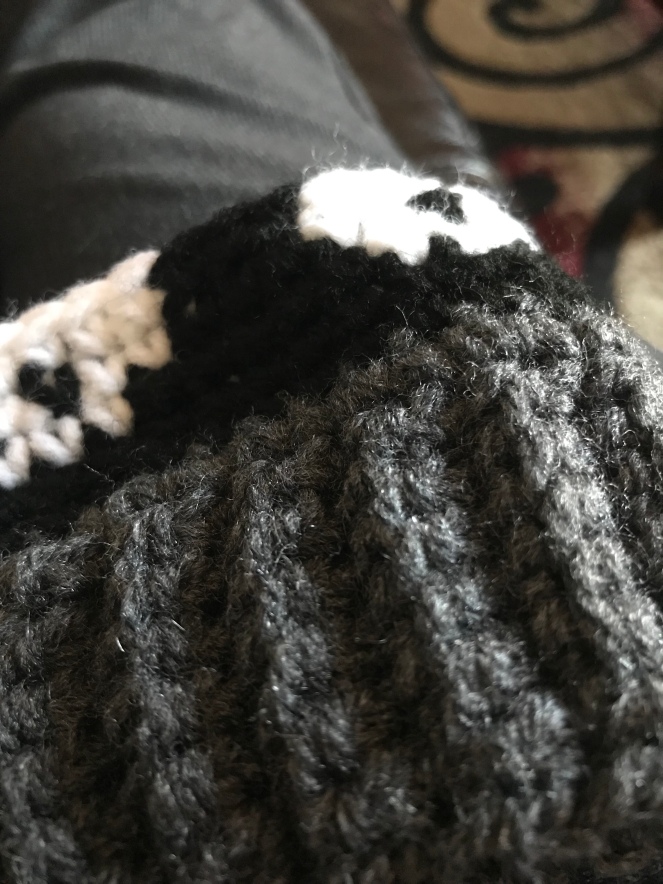
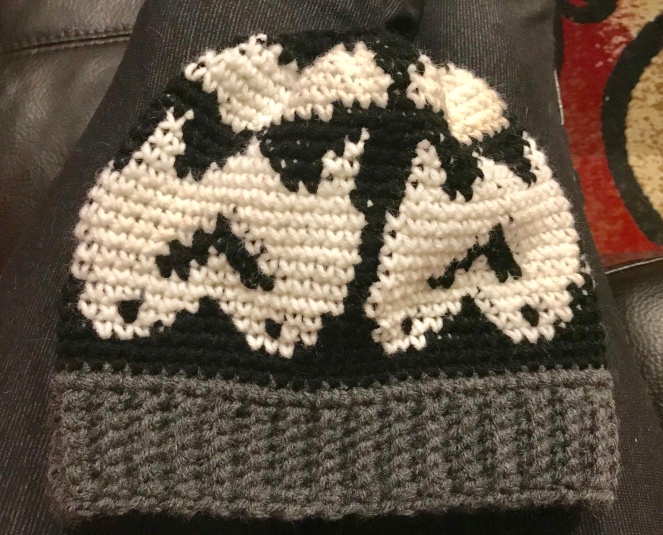
Stormtroopers.. what?!!! Yes. I did that!
Every year for Christmas I make my nephews new winter toques. I’ve done it ever since they were born, so it’s kind of become a tradition. They’ve gotten some pretty awesome hats over the years… everything from, Cars to Mario & Luigi to matching Sully & Mike hats… not to toot my own horn or anything… but this year they were really into Star Wars, which I know very little about, so I really had to bring it up a notch and make something that would really blow them away! I found an awesome paid pattern on Ravelry for a BB8 hat, and I knew instantly that my youngest nephew would love it. Done deal! My oldest nephew, however, needed something a little more grown up and I was really struggling to find an awesome Star Wars hat pattern in a suitable size for him. When googling “Star Wars” I happened across a graph of a stormtrooper head and that’s when I decided that I would just create my own hat based on that graph alone. End result – nephews LOVE their news hats and Auntie Manna is the bomb this year! 😉 Ultimately, though, the pattern is way too cool not to share.. so without further ado, here it is!!
Stormtrooper Hat
This hat pattern is made to fit a large child or preteen. To increase or decrease in size you may begin with more or less ribbing rows (since the hat is worked from the bottom up). Just remember that with this pattern you MUST work in multiples of 17.
I used a 5mm / H hook and Red Heart Super Saver in charcoal, white, and black for this project. Any basic medium worsted weight will do.
What you’ll need:
- Scissors
- Tapestry needle
- 5mm / H crochet hook
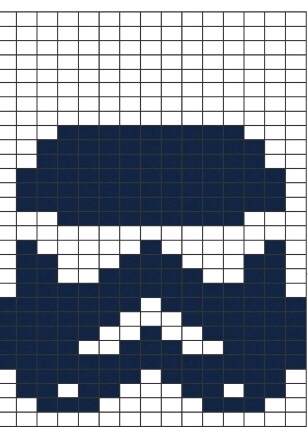
- Stormtrooper graph to follow
Stitch Abbreviations
Ch – Chain
Ss – Slip stitch
St(s) – Stitch(es)
Sc – Single crochet
Hdc – Half Double crochet
Hdc2tog – Half Double crochet 2 Stitches together
BLO – Back loops only
Colours will be referred to as:
CA – Colour A (charcoal)
CB – Colour B (black)
CC – Colour C (white)
Note: it helps to carry your yarn behind your stitches as you go, making colour changes easier. BE CAREFUL OF YOUR TENSION!
Hat Ribbing
With CA ch 9. (68)
- Sc in 2nd ch from hook, sc across to end. Ch 1. Turn. (8)
- Sc in first st, sc BLO in next 6 sts, sc through both loops of last sc. Ch 1. Turn. (8)
- Repeat row 2 until you have a total of 68 rows. Ch 1.
- Bring ends together, ss in each st across BOTH ENDS in the same fashion you worked row 2.
- Turn ribbing so your seam is on the inside.
Change to CB.
Hat Body
For visual colour changes please refer to stormtrooper graph posted above. White boxes are CB and black boxes are CC. ** If using written pattern only please pay very close attention to colour changes!!
- Using CB sc 68 sts evenly across ribbing. Ss to first sc. Ch 1.
- With CB sc in same st as joined and in each of next 2 sts, *with CC sc in next 3 sts, with CB sc in next 5 sts, with CC sc in next 3 sts, with CB sc in next 6 sts*. Repeat from * to * around to last 3 sc, using CB sc in last 3 sts. Ss to top of first sc. Ch 1.
- With CB sc in same st as join and in next st, *with CC sc in each of next 2 sts, sc once with CB, sc with CC in next 2 sts, with CB sc in next 3 sts, sc with CC in next 2 sts, sc once with CB in next st, sc with CC in next 2 sts, with CB sc in next 4 sts*. Repeat * to * around to last 2 sts, using CB sc in last 2. Ss to top of first sc. Ch 1.
- With CB sc in same st as joined and next st, *with CC sc in next 6 sts, with CB sc in next st, with CC sc in next 6 sts, with CB sc in next 4 sts*. Repeat from * to * around to last 2 sts, using CB sc in last 2 sts. Ss to top of first sc. Ch 1.
- With CB sc in same st as joined, *with CC sc in next 15 sts, with CB sc in next 2 sts*. Repeat from * to * around to last st, using CB sc in last st. Ss to top of first sc. Ch 1.
- With CB sc in same st as joined, *with CC sc in next 4 sts, with CB sc in next 2 sts, with CC sc in next 3 sts, with CB sc in next 2 sts, with CC sc in next 4 sts, with CB sc in next 2 sts*. Repeat from * to * until last st, using CB sc in last st. Ss to top of first sc. Ch 1.
- With CB sc in same st as joined, *with CC sc in next 5 sts, with CB sc in next 2 sts, with CC sc in next st, with CB sc in next 2 sts, with CC sc in next 5 sts, with CB sc in next 2 sts*. Repeat from * to * around to last st, using CB sc in last st. Ss to top of first sc. Ch 1.
- With CB sc in same st as joined, *with CC sc in next 6 sts, with CB sc in next 3 sts, with CC sc in next 6 sts, with CB sc in next 2 sts*. Repeat from * to * around to last st, using CB sc in last st. Ss to top of first sc. Ch 1.
- With CB sc in first st as joined, *with CC sc in next 7 sts, with CB sc in next st, with CC sc in next 7 sts, with CB sc in next 2 sts*. Repeat * around to last st, sc using CB in last st. Ss to top of first sc. Ch 1.
- With CB sc in same st as joined, sc in next st, *with CC sc in next 13 sts, with CB sc in next 4 sts*. Repeat * around to last 2 sts, using CB sc in each of last 2. Ss to top of first sc. Ch 1.
- With CB sc in first 2 sts, *with CC sc in next 2 sts, with CB sc in next 2 sts, with CC sc in next 5 sts, with CB sc in next 2 sts, with CC sc in next 2 sts, with CB sc in next 4 sts*. Repeat from * to * around to last 2 sts, using CB sc in last 2 sts. Ss to top of first sc. Ch 1.
- With CB sc in first 2 sts, *with CC sc in next 2 sts, with CB sc 3 sts, with CC sc in next 3 sts, with CB sc in next 3 sts, with CC sc in next 2 sts, with CB sc in next 4 sts*. Repeat from * to * around to last 2 sts, using CB sc in last 2 sts. Ss to top of first sc. Ch 1.
- With CB sc in first 2 sts, *with CC sc in next st, with CB sc in next 5 sts, with CC sc in next st, with CB sc in next 5 sts, with CC sc in next st, with CB sc in next 4 sts*. Repeat ** around to last 2 sts, using CB sc in last 2. Ss to top of first sc. Ch 1.
- With CB sc in each st around to last sc. ss to first sc. Ch 1.
- With CB sc in first 5 sts, *with CC sc in next 9 sts, with CB sc in next 10 sts*. Repeat from * to * to last 5 sts, sc using CB in last 5 sts. Ss to top of first sc. Ch 1.
- With CB sc in first 2 sts, *with CC sc in next 13 sts, with CB sc in next 4 sts*. Repeat * around to last 2 sc, using CB sc in last 2 sts. Ss to beginning sc. Ch 1.
- Repeat row 16.
- Repeat row 16.
- With CB sc in first 3 sts, *with CC sc in next 11 sts, with CB sc in next 6 sts*. Repeat * around to last 3 sc, using CB sc in last 3 sts. Ss to first sc. Ch 1.
- Repeat row 19.
- With CB sc in first 4 sts, *with CC sc in next 9 sts, with CB sc in next 8 sts*. Repeat from * to * around to last 4 sts. Using CB sc in last 4 sts. Ss to top of first sc. Ch 1. *Drop carried CC.
- Using only CB from this point forward hdc in each st around. Ss to first hdc. Ch 1.
- Hdc in first st, *Hdc2tog in next 2 sts, hdc in next st*. Repeat from * to * around to last st. Ss to first hdc. Ch 1.
- Repeat row 22.
- Repeat row 23.
- Hdc2tog every st around. Ss to first Hdc2tog. Fasten off leaving long tail.
- Turn hat inside out and, using tapestry needle, weave your tail in and out of every st remaining. Pull tail to close opening at top of hat. Knot tail to ensure security and weave in ends.
..……
This is a FREE pattern and may be shared but not SOLD. Finished products using this pattern may be sold, but please be kind and link back to this blog. Thank you.
